Sunday, November 30, 2008

Sunset Sibling Session

Breah, Monica, and Frank Jr. are my second cousins.  I grabbed them after Thanksgiving dinner for an impromptu sunset photo session. There was this old, abandoned  - oh, let's say shed - I wanted to show them that I thought would be the perfect setting for some teen (and older) portrait shots.  I wasn't disappointed.

It was a race against the setting sun as we made the trek across town. (Darn those 35 mph speed limit signs.)  When we arrived at our location, I knew right away that we didn't have enough light.  And, though some would say I really should have set up the tripod, I opted for an ISO of 1600 instead so I could still hand-hold the camera.  (It's really hard to get those cool tilted angles with the camera mounted on my tripod.)

The result is this really cool, soft, textured look you see here.  Coupled with the warm, dramatic lighting (which cast some powerful shadows), the look is surprisingly very much to my liking - as are these three remarkable young people.


Thank you, Greg and Carolyn, for letting me steal your beautiful (inside and out) children for a short while.  And thank you for loving on my sweet little Alden all afternoon.  If what you say is true (that she reminds you of your Breah), then I can only hope she'll turn out to be as grounded, sweet, and beautiful as Breah is today - as all your children are for that matter.

Tuesday, November 25, 2008

The Shadow Affect

A while back I started looking for interesting images where the shadow the subject created was the main focus of the image.  This self-assigned project was designed to help me learn how to see and understand light better.  In order to get the shadow portion of the image just right, I had to learn how to place the subject so that the light falling on the subject created the most interesting shadow.  This taught me quite a bit about directional light.

In creating images using shadows it is important to know a few things about sunlight.  The longest shadows are cast during the early morning (just after sunrise) or late evening (just before sunset) hours.  The closer you are to mid-day, the shorter your shadows will be.  

Where the shadow will fall also depends on where the subject is placed in relation to the sun.  Do you want the shadow to fall behind your subject?  Then the sun should be in front of your subject.  Do you like the look of the shadow just off to one side? Then you need to be sure the sun is positioned to either side of your subject.  It's all pretty common sense stuff that we tend to take for granted.  Until you stop to think about it, you really don't begin to actually "see" the shadows around you.

Below are some of my favorite shadow images.  I'll provide a brief "recipe" of the shot below each image.

This was my very first shadow image.  It wasn't my goal to "make" this image, I just saw it while taking this little girl's portrait and had to capture it.  Admittedly, this image is a bit "Hallmarky", but I love how it speaks to this girl "being a girl".

The direction of the sunlight is coming in straight from the girl's left side causing the shadow to fall to her right.

This next image was meant to tell a story.  I wanted the shadow to "say it all".  I kept the family in the image, but cropped it down so that their faces did not show.  The shadow says "family" without even having to show the family.  I love how the football and soccer ball on the ground in front of them hints at the fact that there are little boys in this family and speaks to their interests - adding to the story.

The image was taken late in the evening just before sunset.  Notice how much longer the shadow lines are at this time of day.  The sunlight is positioned directly behind the family which causes the shadow to stretch toward the front of the image.  Since I was using a fixed lens, I had to climb a ladder in order to get all of the long shadows to fit in the image.

This image above was obviously staged.  I placed my son's toys in our entry way with the light coming in from above and behind the toys toward their left side.  See how the shadow tilts a little to their right? What I want you to notice here is that although the animals are not touching, their shadow makes it appear as though they are (Nice kiss, huh?).  The image was made at 1:00 p.m., so again, the shadow is quite short.

Okay, so I like little girls with flowers.  This is my daughter while on our mid-morning walk.  The sunlight is behind her to the left side.  This causes a longer angled shadow falling just in front of her.  The image would be precious (to this mother, anyway) without the shadow affect. What the shadow adds (to me, anyway) is a sense of lightness and movement that screams girlie, youthful energy.

This image was staged as well.  Like the family holding hands, I wanted the shadow in this image to tell the whole story.  The sunlight is coming from above toward the left side of my son.  It casts a shadow falling to the right of the image.  This was taken at noon.  

One trick I used to help the shadows stand out in many of these images was to open the files in Bridge Camera Raw and add Blacks and Contrast to the images.  This caused the shadow to really stand out. Just be careful to adjust the Exposure accordingly.

So where does all this talk about shadows come in to play in portrait photography?  When doing close-ups it is important to keep in mind that the sun can leave unattractive shadows on your client's face.  This is why open shade is often recommended.  Think about it.  If the harsh sun is directly above your client, you will most likely see shadows under the eyes, nose, and chin.  If the harsh sunlight is to one side or the other, you will usually notice shadows to either side of the nose  - distorting the nose and making it appear longer.  

Shadows are not all bad, though.  You can use shadows to add dramatic lighting to your images.  Just by knowing how to identify the light and where and how to place your subject, you can change a 1-1 lighting ratio portrait into a 1-4 lighting ratio portrait.  Understanding the light (and it's shadows) you are working with gives you so many more creative options.  No longer are you tied to open shade - IF you know what you are doing.

Mostly, I just want you to see how using shadows can add to the creative aspect of your images.  Use it to your advantage to add punch and interest.  Keep its affects in mind to avoid possible flaws.  Mostly, study it.  Learning to SEE the shadows in images will teach you so much about how to use and manipulate the light around you to your creative advantage.

Sunday, November 23, 2008

Photo Retouches

Many people have asked, when inquiring about my fees, if I include minor retouching in my print prices.   The answer is "Yes, for SIMPLE retouches, I do." 

As a standard I always lighten up under the eyes and touch up minor skin blemishes.  Anything above and beyond that incurs a retouching fee. Things like removing difficult scars, whitening teeth, brightening the eyes, reducing the size of one's double chin, removing stray hairs from the face, reducing the appearance of wrinkles, or creating storyboards and collages all require significant time.  And, as the saying goes, "Time is money."

For those of you who are reading my blog for the tutorials, I thought I would show you some before and after pictures.  Keep in mind that this is not a step-by step tutorial.  There are books and online tutorials available for that.  I will, however, walk you through my basic retouching process.

Of course, my goal is always to capture the image in camera as close to perfect as I can (as far as exposure, clarity and color correction goes).  If I can keep my retouching to under 5-10 minutes per (printed) image, then I'm doing well.  

Before I continue, I do want to address a trend I've seen with some photographers lately.  I look at a ton of photographer's blogs as part of my continuing research and professional development.  What I've seen lately really surprises me.  One such photographer posted a before and after picture that was simply unbelievable.  Somehow they were able to take a technically poor image and work miracles using Photoshop and other plug-ins to make it look more professional.  The result was very fake and unnatural looking.  What surprises me even more, is that people seem to really be going for that look.

Not that every picture a professional takes is going to end up technically perfect, but it should be their goal.  We are making pictures not taking them, afterall - to quote my professor.  Undoubtedly when you move from the shaded tree to the sunny steps (all while chasing down a two year old) you are going to forget to change a setting from time to time. But if you don't know how to make a correct exposure at least some of the time, I wonder how one can justify charging people for their "expertise".

Enough said.  It's off my chest.

I thought I'd show you three examples of my typical retouching process. I'll post a short description of the retouching I did below each image. This first image below is shown as taken.  Nothing has been done to the image.  It's both sharp, well exposed, and in focus.

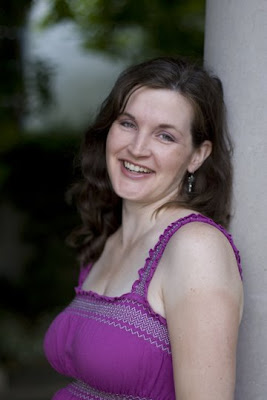
Below is the image after my initial post-processing routine.  This step takes all of 30 seconds (not one action or plug-in involved), but look at the difference!  I do this to all images before uploading them into my client galleries.  Take a closer look and you'll notice that I gave it a tighter crop as well.

Because she is partially in the shade, the image was a little on the cool side, so I warmed it up in Bridge by opening it up in Camera Raw and adjusting the Temperature settings - just slightly.  This made the colors warmer and richer and made her skin glow.  I also adjusted the exposure - again just slightly (to lighten it up just a bit).  By adjusting the fill-light, blacks, contrast, and clarity I was able to add a three dimensional quality.  Again, all this took a whopping 30 seconds.  At this point I had still not done any major alterations to the image that would incur a fee.  This comes in the next step.

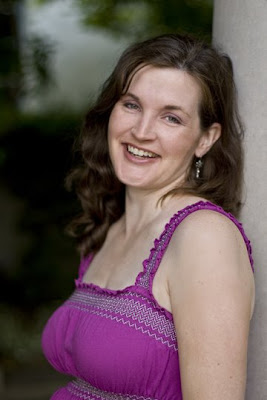
In addition to the basic refinements I did to the second image (which, by the way, can be done to a group of similar images all at one time by utilizing Batch Processing), I always lighten up under the eyes and fix minor skin blemishes included as part of my print prices.  This step usually takes about 5 minutes.

Not included in my print prices are the more time-laden touch-ups that this image still needed. The client had requested that I even-out her tan lines on her upper arms and around her neckline.  While I was at it, I evened out some of the skin tones on her face as well.  The whole retouch took about 30 minutes.  Getting the skin tones from the tan lines to appear natural and evened out took a good eye - and several different steps and techniques.

So, that's it in a nut-shell.  My average retouching experience.  

Now, one last question that I often hear is this: "Why do you charge for each additional person over the four people limit?"  The answer ties into this lesson.  If it takes me 20 minutes to retouch one person's face, imagine how long it takes to retouch 12 people's faces.  That's additional time away from my family and additional resources and talents employed on my part.  Simply put, time and talent worth charging a retouching fee.

Wednesday, November 19, 2008

A Little Brotherly Competition

Believe it or not this family was my very first paid session last year when I just started my photography business.  It was so much fun to take their pictures again this year for their Christmas cards.  You may recognize Jacob and Grant from the B&W gallery on my website.  


It was quite cold on Saturday - and windy too!  In order to stay warm, we had to search for spots behind building walls to keep from freezing our tail ends off.  We'd take a couple pics, put the jackets back on, then take a few more.  Anything to keep warm.

Also helping to keep the boys warm were a few brotherly competitions I conjured up.  First they arm wrestled:

Then they blew bubbles:


They even showed a little team spirit:

And, then it was time to get down to business.  Mom wanted family pics for their Christmas cards, remember?


Done!  On to a little experiment of mine...

All in all, it was a great day!  Thanks guys.  Your gallery is up on my site now.  One last thing.  Did I mention it was WINDY!?!

Monday, November 17, 2008

On the Other Side of the Lens

I had the extreme pleasure of photographing my friend Kara and her family out at Frisco Heritage Park on Saturday.  She's a dear friend - and fellow photographer.  It was super windy and quite chilly too, but her boys were such good sports through it all.  What a great way to spend the morning.  

It was so nice to have Kara at the shoot.  I'm not used to having another professional on hand to bounce my ideas off.  And, she in turn bounced some of her own my way.  I especially love this particular idea of Kara's below:

We both noticed that the door to the lovely chapel was open and couldn't wait to see what was inside.  We gasped at how gorgeous it was!  The light was unbelievable!  Take a look.  Aren't Ean and Evan so handsome?  Their mom and dad are striking as well.


Speaking of weddings, I'm not sure if the Frisco Heritage Park rents this small chapel out for weddings, but if they do, give Kara a call. She'd love to photograph your special day.  Weddings are her specialty. This beautiful image below is one of my absolute favorites from Kara's portfolio.  It's stunning!  I want to cry every time I see it.  You can view the rest of Kara's portfolio by clicking on the link (her name) above.

Back to our session on Saturday:  Once we warmed up indoors it was time to take the session back out in the cold.  Here's some more fun images from their session.  I'm so thrilled with how they turned out.  

Enjoy!


Wednesday, November 12, 2008

Indiana Free Session Winner

Kelly entered my free session contest earlier this year.  Like Kerry, she earned an additional entry into the drawing for each friend who entered the contest - which quickly added up.  With all those entries it's no wonder my son picked her name out of the Indiana hat as the Hoosier winner.

My parents live in Indiana and I visit there at least twice a year, so I've been eager to photograph in a different location.  In preparing for Kelly and Mike's family shoot, I drove around town looking for a more urban setting to fit their young and hip lifestyle.  The moment I saw these abandoned semi-trucks and the old town theatre, I knew I had found the spot.  

Imagine my surprise when I stumbled upon pictures taken at this very spot on a local photographer's website in that area.  Here I thought I had this amazingly unique idea (and it was to me at the time) only to find out someone had already "been there, done that."  Do you think Christopher Columbus felt the same way when he discovered a new land only to discover it had already been discovered?

So now, if someone asks me about a certain location I've taken pictures at, I'm not as likely to to be greedy with that top secret information.  I figure they're going to stumble upon it someday on their own anyway.  

Whether the location I chose for Kelly's family pictures had been used before or not, I like to think I gave it my own unique flare.  Take a look for yourself.  (You may have seen several of these on my website.  You can also see more of Mike and Kelly in my couple's gallery.) 

This session was so much fun.  What made it even more fun?  Kelly is the sister of my brother Phil's wife Shari.  It was such a thrill to photograph part of her family!  Thanks Mike and Kelly.  This session was a blast!


Sunday, November 9, 2008

Side-Lit Photography

Now that you've got back-lighting and front-lighting under your belt, there's just one last basic type of available lighting to cover: Side-lighting.  This type of lighting involves placing your subject so that the main light source falls on just one side of your subject's face.  Often this leaves shadows on the opposite side of the subject's face.  

The amount of shadow falling on the subject's face is referred to as the lighting ratio.  There are four different lighting ratios.  I'm not going to cover those in this post, but you can Google lighting ratios to learn more.  The lighting ratio is determined by the angle your subject is sitting toward or away from the main light source.  By turning your subject's face further away from the light source, you can create greater shadow in the image.  And, of course, the opposite is also true.  By turning your subject toward the light source you can decrease the amount of shadow in the image.

Side-lighting is used for a number of reasons.  It is often used to bring a sense of shape, dimension and depth to an otherwise ordinary image (as in the first image below). 

It also adds a sense of drama and wonder to an image - something that wouldn't be as evident in a front-lit or back-lit image (as in this image of the curious little girl below).  


By introducing shadows into an image, side-lighting can also help you conceal what you would rather not fully disclose.  Imagine your client has a scar on their left cheek that they are extremely sensitive about.  By using side-lighting streaming in from the right, you can fill the left cheek with shadows by turning your client's face until the shadows partially or totally conceal the scar.  

Personally, I think our scars are what help to define us, but it's nice to know we have a tool at our disposal (other than time in Photoshop) to help put our clients at ease, if need be.

Side-lighting: It's a powerful, creative, and liberating tool.

Thursday, November 6, 2008

And the winner is...

Kerry entered my free session drawing earlier in the year and referred several of her friends who did the same.  On Valentine's Day my son drew her name out of a hat as the Texas winner of our free session contest.  He also drew a name for the Indiana winner.  I took those pictures earlier this summer and will post those next week.

Kerry and Paul's twins, Tomas and Ani, have been in my son Stephen's class at school for three years in a row now.  They have so much fun together.  They are the sweetest children.  Kerry and I have gotten to know each other pretty well too, and I'm proud to have her as a friend.  

They are such a great family.  Dad even climbed a tree with them.  Take a look!


Wednesday, November 5, 2008

Front-Lit Photography

Hopefully, you have all been keeping an eye out for those beautiful, backlit fall landscapes.  I love this time of year - especially for that reason.  Not only are there stunning fall colors everywhere you look, but bushes and trees have so much more to offer than just breathtaking leaves.  They are havens for all sorts of textured nuts and colorful berries.  

To capture these images, you need a different type of lighting.  Front-lit lighting works so much better when your goal is to highlight the shape, form, and color of berries against their leafy backdrops.  The following image was taken with the sun shining directly on the berries - a front lit image.

I love how the bright fall berries stand out among the twigs and greenery in the background.  The front lighting seems to make the berries burst with color.  That's the beauty of front-lighting - which can also work wonders for portrait photography as seen in the image below.

Of all places, I discovered this lighting in the back of our Tahoe that was parked inside our open, north-facing garage.  I had been looking for this angelic light for so long.  Once I saw it, I quickly changed my daughter into a pretty dress, grabbed my camera and came up with this image - which has quickly become one of my all time favorites.

Believe it or not, you can find this type of lighting indoors as well.  Look for a north facing window, place your subject several feet in front of the window - with their faces pointed toward the light (the window).  Place yourself (with camera in hand) right in front of the window, between the window and your subject.  This is a great way to practice front-lighting your subject.  The image below was taken using this technique.

The beauty of available light is that you don't have to carry around heavy equipment.  The down-side is that you are often at the mercy of the weather.  When is the best time to photograph outdoors?  The hour after sunrise and the hour right before sunset are the optimal times.  If you can not photograph during those times, you'll have to look for open shade.

What is open shade, and where do you find it?  Look for areas just outside of direct sunlight.  Shaded areas work well as long as you find a spot where the sunlight bounces in to fill the space with light.  Once you find a shaded area, simply place your subject just inside the shaded area and face them toward the direction of the sun.  Your goal is to let the sun bounce off the ground just in front of your subject filling their face with lovely light.  Under awnings, just inside an open doorway, alleyways, and under the shade of a building work well too.  Just make sure that the sun is bouncing toward the shaded area.

This last image shows an image front-lit with direct sunlight.  The harsh lighting here actually works to our advantage filling the beads with color and sparkle.  The same harsh, direct lighting used on a person would fill your subject's face with ugly shadows.  It works well on this stepping stone though.  

Next up we'll cover side-lighting.