Many people have asked, when inquiring about my fees, if I include minor retouching in my print prices. The answer is "Yes, for SIMPLE retouches, I do."
As a standard I always lighten up under the eyes and touch up minor skin blemishes. Anything above and beyond that incurs a retouching fee. Things like removing difficult scars, whitening teeth, brightening the eyes, reducing the size of one's double chin, removing stray hairs from the face, reducing the appearance of wrinkles, or creating storyboards and collages all require significant time. And, as the saying goes, "Time is money."
For those of you who are reading my blog for the tutorials, I thought I would show you some before and after pictures. Keep in mind that this is not a step-by step tutorial. There are books and online tutorials available for that. I will, however, walk you through my basic retouching process.
Of course, my goal is always to capture the image in camera as close to perfect as I can (as far as exposure, clarity and color correction goes). If I can keep my retouching to under 5-10 minutes per (printed) image, then I'm doing well.
Before I continue, I do want to address a trend I've seen with some photographers lately. I look at a ton of photographer's blogs as part of my continuing research and professional development. What I've seen lately really surprises me. One such photographer posted a before and after picture that was simply unbelievable. Somehow they were able to take a technically poor image and work miracles using Photoshop and other plug-ins to make it look more professional. The result was very fake and unnatural looking. What surprises me even more, is that people seem to really be going for that look.
Not that every picture a professional takes is going to end up technically perfect, but it should be their goal. We are making pictures not taking them, afterall - to quote my professor. Undoubtedly when you move from the shaded tree to the sunny steps (all while chasing down a two year old) you are going to forget to change a setting from time to time. But if you don't know how to make a correct exposure at least some of the time, I wonder how one can justify charging people for their "expertise".
Enough said. It's off my chest.
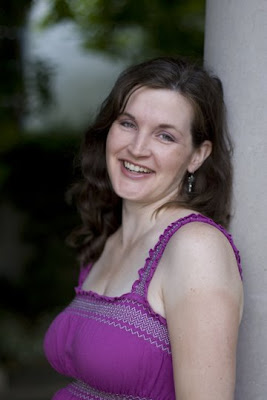
I thought I'd show you three examples of my typical retouching process. I'll post a short description of the retouching I did below each image. This first image below is shown as taken. Nothing has been done to the image. It's both sharp, well exposed, and in focus.

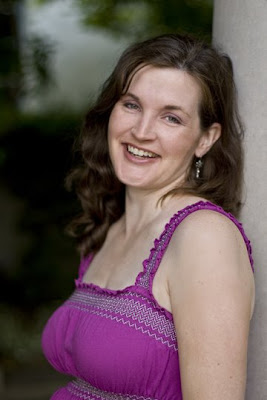
Below is the image after my initial post-processing routine. This step takes all of 30 seconds (not one action or plug-in involved), but look at the difference! I do this to all images before uploading them into my client galleries. Take a closer look and you'll notice that I gave it a tighter crop as well.
Because she is partially in the shade, the image was a little on the cool side, so I warmed it up in Bridge by opening it up in Camera Raw and adjusting the Temperature settings - just slightly. This made the colors warmer and richer and made her skin glow. I also adjusted the exposure - again just slightly (to lighten it up just a bit). By adjusting the fill-light, blacks, contrast, and clarity I was able to add a three dimensional quality. Again, all this took a whopping 30 seconds. At this point I had still not done any major alterations to the image that would incur a fee. This comes in the next step.

In addition to the basic refinements I did to the second image (which, by the way, can be done to a group of similar images all at one time by utilizing Batch Processing), I always lighten up under the eyes and fix minor skin blemishes included as part of my print prices. This step usually takes about 5 minutes.
Not included in my print prices are the more time-laden touch-ups that this image still needed. The client had requested that I even-out her tan lines on her upper arms and around her neckline. While I was at it, I evened out some of the skin tones on her face as well. The whole retouch took about 30 minutes. Getting the skin tones from the tan lines to appear natural and evened out took a good eye - and several different steps and techniques.
So, that's it in a nut-shell. My average retouching experience.
Now, one last question that I often hear is this: "Why do you charge for each additional person over the four people limit?" The answer ties into this lesson. If it takes me 20 minutes to retouch one person's face, imagine how long it takes to retouch 12 people's faces. That's additional time away from my family and additional resources and talents employed on my part. Simply put, time and talent worth charging a retouching fee.


1 comment:
A long time ago in a land far away a good friend requested that I touch up a photo for his ad on a dating site. I spent many hours on the project using Windows Paint...I removed one of his legs from the photo. He didn't notice! When I finally pointed it out he was visibly disturbed.
When I rode motorcycles with a number of friends we all had a habit of editing the pictures of us jumping the bikes so that it looked like we were jumping much higher/further than we actually were and seeing if anyone figured it out. Editing pictures is fun if you have time, but I don't didn't get paid for it. Thanks for entertaining this rather pointless comment.
- Ethan
Post a Comment