The aperture is an adjustable opening found inside the lens used to regulate the amount of light passing through the lens and onto the film (or digital media). Apertures are measured as f-stops. A large f-stop (f/11, f/16, f/22, etc.) indicates a small aperture. Small f-stops (f/1.4, f/2.8, f/5.6, etc.) indicate a large aperture.
While aperture can be used to manipulate the amount of light you allow into your camera, it is better known for its ability to manipulate depth of field (the area of sharpness from near to far within a photograph).
If you want everything in your picture to be tack sharp (from the flowers lining the fence in the foreground to the chimney on the farmhouse in the distance), then you need to select a smaller aperture (anywhere between f/16 - f/22 or greater).
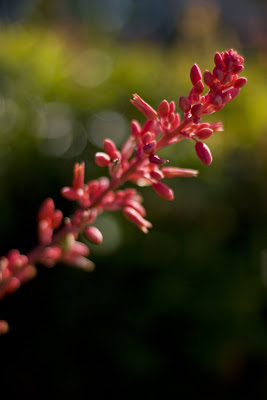
In contrast, if you only want a small amount of your image to be in focus (you want to focus in on just one red rose from your grandma's entire rose garden), then you will want to use a larger aperture (anywhere between f/1.4 - f/5.6). The smaller f-stop will blur the background while keeping your subject in focus. This helps to isolate your subject and bring more attention to it (as in this image below):

In his book Understanding Exposure, Brian Peterson explains aperture like this:
"Imagine using a funnel with a very small opening and pouring a one-gallon can of paint through it into an empty bucket. Compare this process to pouring a one-gallon can of paint into the same empty bucket without the aid of a funnel. Without the funnel, the paint gets into the bucket quicker, but it also splatters up on the bucket sides, as well. With a funnel, the transfer of paint into the bucket is cleaner and more contained. Keeping this is mind, you can see that when light is allowed to pass through small openings in a lens, a larger area of sharpness and detail always results."
In the image above, I used a very large aperture - which in essence allowed the light to splatter along the sides of the paint bucket. So, only the area focused on (the red flower) is sharp. The out-of-focus blurry background is the remainder of light that was allowed to splatter up along the sides of the bucket. Had I taken this image with a very small aperture (f/22), then every leaf in the background would have been tack sharp.
So what aperture do you choose? It all depends on the end result you desire. If you want to see every tiny detail from front to back, choose a very small aperture (large f-stop). Get out your funnel. If you want to limit the area of focus to a single area within a larger composition, you will want to purposefully blur most of the other details in your image by choosing a very large aperture (a very small f-stop). Pour the light in and let it splatter!
I don't know about you, but I'm a visual learner and have always learned best by seeing concepts in person. So, to illustrate what happens when you adjust your aperture, I've included the following three images:

In the first image, you'll notice that very few of the rows of beads are in focus. At f/1.4 (a very large aperture) most of the light was allowed to splatter away from the central area of sharpness creating an image that is mostly out-of-focus.
In the second image I used a medium aperture of f/5.6 to create a somewhat sharper image. But, because it is still a lower f-stop, you still see some fall-off on the outer edges of the image. You could say I used a funnel here - just a very large one.
The last image was taken at f/22. You'll notice that every bead is tack sharp. With this tiny aperture (large f-stop), all of the light was contained leaving nothing to splatter onto the edges. As a result every bead is tack sharp. If you look closely, you will even notice that the bookshelves behind the bead board also came into greater focus at this aperture.
If you are really paying attention, you will also notice that all three images appear equally bright. To achieve the same exposure for each image I had to remember to adjust the shutter speed or the ISO settings each time I made an adjustment to my aperture. Had I not done that, the image would get darker each time I switched to a smaller aperture.
Confused? Think about it this way. If the aperture is the size of the hole inside your lens where light enters the camera, doesn't it make sense that less light would be entering the camera if the size of that hole is shrinking? So, how do you get more light into the camera? Simply make sure that hole stays open longer. And that in a nut-shell is why I must change the shutter speed to ensure a proper exposure.
Last time we learned about shutter speed (timing). Can you see now how it is all coming together? This photography stuff isn't as daunting as you thought, now, is it?
There's just one last thing to discuss when it comes to aperture and depth of field. When using a large aperture (a small f-stop), it is important to remember to keep your subjects on the same plane when taking group pictures. If one person is further in front of another, one will be in focus and the other one will be out of focus (one will be right under the funnel and the other will be splattered up against the side of the bucket). Similarly, if one is taller than the other (and I've focused in on the taller of the two), the shorter one may not be in focus because he is on a different plane.
In cases like this you may want to go with a smaller aperture (a larger f-stop) to insure that everyone of importance remains in focus. When taking group pictures, another good tip is to tell your subjects to imagine their noses are all touching the same pane of glass. This will help to keep them all on the same plane - and in focus. Sitting them at a table or on a couch also helps to keep them in the same plane of focus.
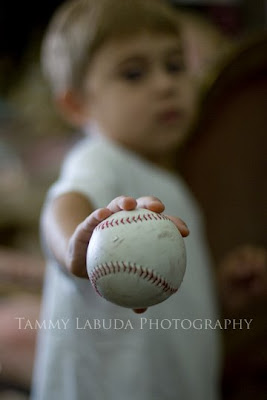
The following two pictures illustrate this well:
In this first image, the boy and the ball are almost on the same plane, so both are pretty much equally in focus. If you look closely, though, you will notice that the ball is not quite as sharp as the boy. This is because the ball is on a slightly lower plane than the boy's face (which was the focus point for this image).
Keep in mind that this is the nature of a large aperture. It lends itself to a very shallow depth of field. When using a small f-stop it is not uncommon to have one eye in focus and the other blurry. To make the portrait appear sharp, remember to focus in on the eye closest to the camera. It also helps to shoot straight into your subject's eyes (not looking down on or up to) and to step back a little. The closer you are to your subject, the less of the image will be in focus.
In the last image, the ball is in front of the boy, and the boy is set further back. The boy falls out of the plane of focus and is blurred as a result. Using a low f-stop is the trick to isolating the ball from the boy - which can be a really cool affect. It's how you can make a lone flower stand out amidst a whole bed of roses. It's how you can focus in on just one child's face in a crowd of many other children. It's how you can avoid a distracting background from overwhelming your subject. In short, it's a photographer's best friend.
Having a good understanding of aperture and shutter speed separates the beginners from the pros. It takes a lot of practice, though, so grab your cameras, and get out there! The fun is just beginning.


